Chop the dialogue. Play it. Keep the take.
The dialogue sampler that keeps your performance.
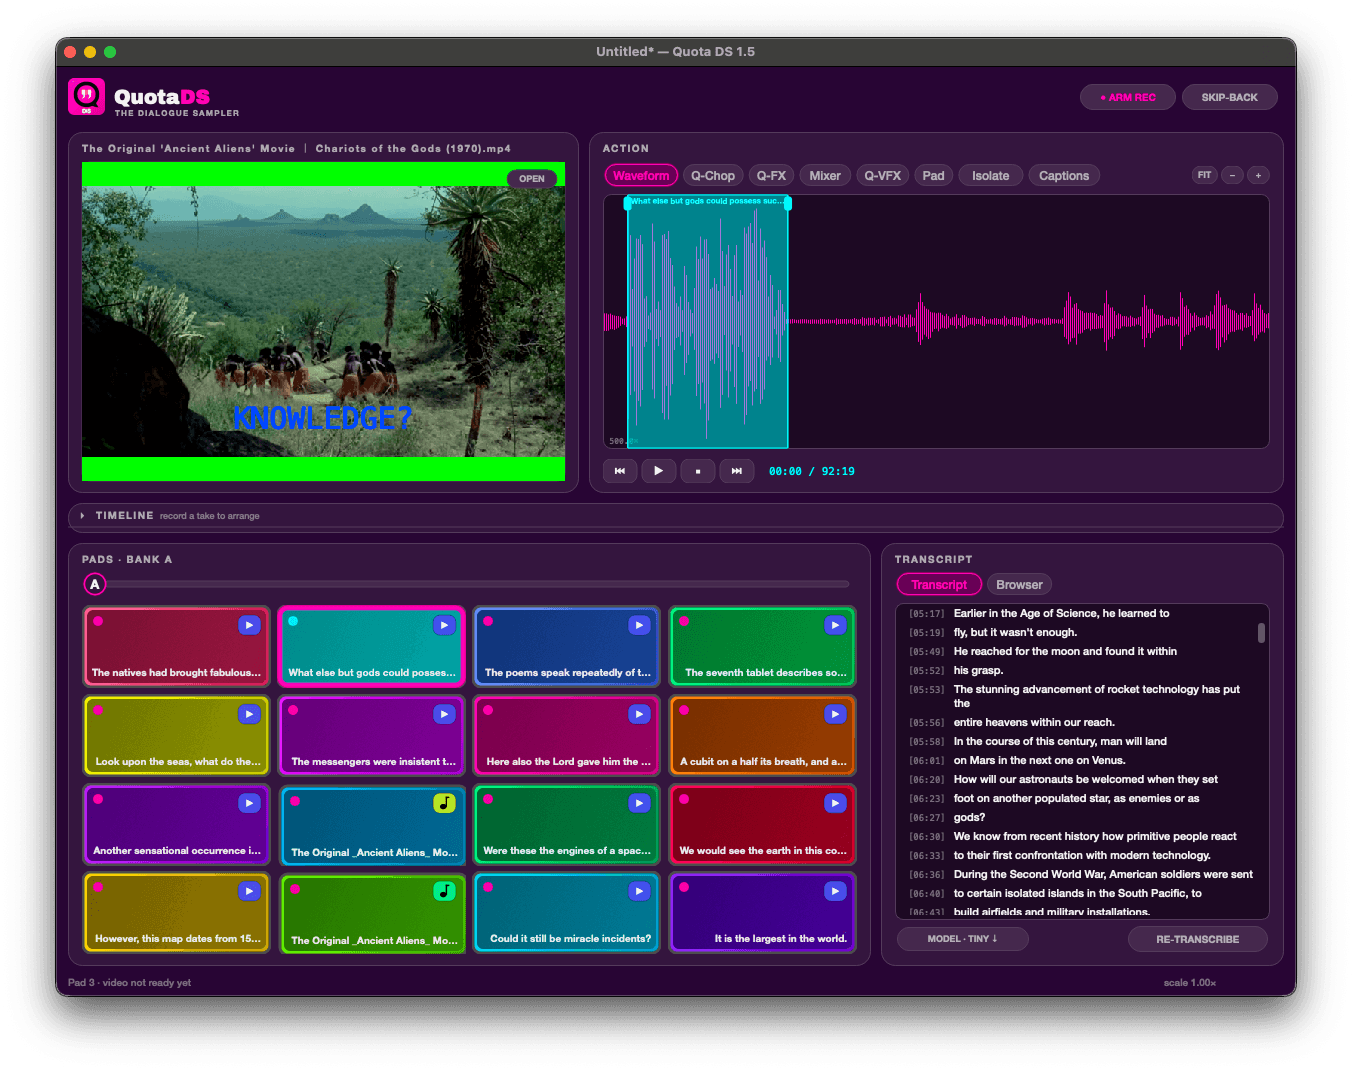
Drop in a video or an audio file and Quota DS transcribes it on your machine with Whisper. Q-Chop lays the lines out across the pads and you start playing. When something lands, record it. The timeline opens with one lane per pad and the real waveform of every hit, so you can move clips around, loop a section, and export the whole thing to MP4. Drop a video on a pad and that pad plays the picture too, so the cut follows your finger.
$99 one-time.
macOS and Windows. 30-day free trial, no card. Runs on your machine.
From a movie file to a finished MP4.
Six moves. None of them send your audio anywhere.
Load it
Click the video well and pick a file, drag one in from Finder or Explorer, or hit PASTE LINK and it pulls the media down off a URL. Video and plain audio both work. An audio file loads the same way, there is just no picture, so you work off the wave.
Clean it up if it needs it
Dialogue is rarely clean. There is music under it, a room, traffic. The Isolate tab pulls the voice out and leaves the rest. Do it before you chop, so the pads are cut from the clean audio.
Transcribe it
Whisper runs over the audio and hands back timestamped lines. Pick the model on the MODEL chip. Base is the default and holds up on most dialogue.
Chop it
Q-Chop drops those lines onto the pad grid. Or drag across any words in the transcript yourself, inside one line or across several, and click a pad to put that phrase on it.
Play it and record it
Shape each pad with its own envelope, pitch, filter, pan and gain, route it to a bus, put an effect on the bus. Hit ARM REC and play. Everything you do gets captured.
Arrange it and get it out
The timeline opens with your take on it. Move the clips, loop a section, then hit EXPORT and it writes an MP4 with the audio baked from where the clips sit now.
Every line is already a sample.
The transcript panel runs Whisper over your media and gives you timestamped lines. Tap a line and it fires that pad. Drag across the words you want and click a pad to assign the phrase.
The MODEL chip cycles five models: tiny, base, small, medium and large. Base is the default. Reach for medium or large when the audio is noisy, the speaker is fast, or you want tighter word timing. Models are not bundled. The first time you transcribe with one you do not have, it downloads once and then it is on your drive. Tiny is about 39 MB, base 74 MB, small 244 MB, medium about 769 MB, large about 1.5 GB.
RE-TRANSCRIBE runs the same media again with a heavier model. The old words stay readable while the better ones come in, and CANCEL is there the whole time a run is going.
Q-Chop
Q-Chop cuts the transcript onto the pads for you. Three modes:
- Smart finds the lines worth keeping.
- Sentences cuts on punctuation, so every chop is a complete sentence.
- All Segments takes every line in the transcript.
Smart and Sentences take a count: 8, 16, 64 or 128. All Segments takes no count, because it gives you all of them. The grid is 16 pads to a bank and eight banks, A through H, so 128 chops fills the whole thing.
It does not overwrite your pads. Q-Chop walks from A01 forward and steps over any pad you filled yourself, overflowing bank to bank around them. The one thing it will reuse is its own last output from the same source, so a re-chop lands back where the last one did instead of piling up. UNDO CHOP and REDO CHOP are right there, so trying Sentences 16 against All Segments costs you nothing.
Pull the voice out of the mix.
The Isolate tab separates the dialogue from everything under it. Pick what you want to keep and press ISOLATE VOCALS:
- VOCALS is the default, because this is a dialogue sampler.
- INSTRUMENTAL keeps everything except the voice, for when you want the score or the room and not the talking.
- BOTH writes both files in one pass at no extra time.
The model ships inside the app. Nothing downloads and nothing uploads, so this works with the wifi off, on a plane, wherever you are. On Apple Silicon it runs on the graphics chip, so it moves.
Run it before you chop. That is the clean order: isolate, transcribe, then Q-Chop off the isolated audio. If you have already built a layout and then isolate, DS tells you plainly that isolation replaces the source audio and lets you decide, instead of quietly re-pointing your pads.
REVERT TO ORIGINAL puts the file you opened back underneath, no matter how many times you have isolated. Both files stay on disk either way. On a video, the isolated voice is muxed back onto the picture, so the video keeps playing normally with clean dialogue on it, and the separate wav gets written too.
Sixteen pads, eight banks, every one its own instrument.
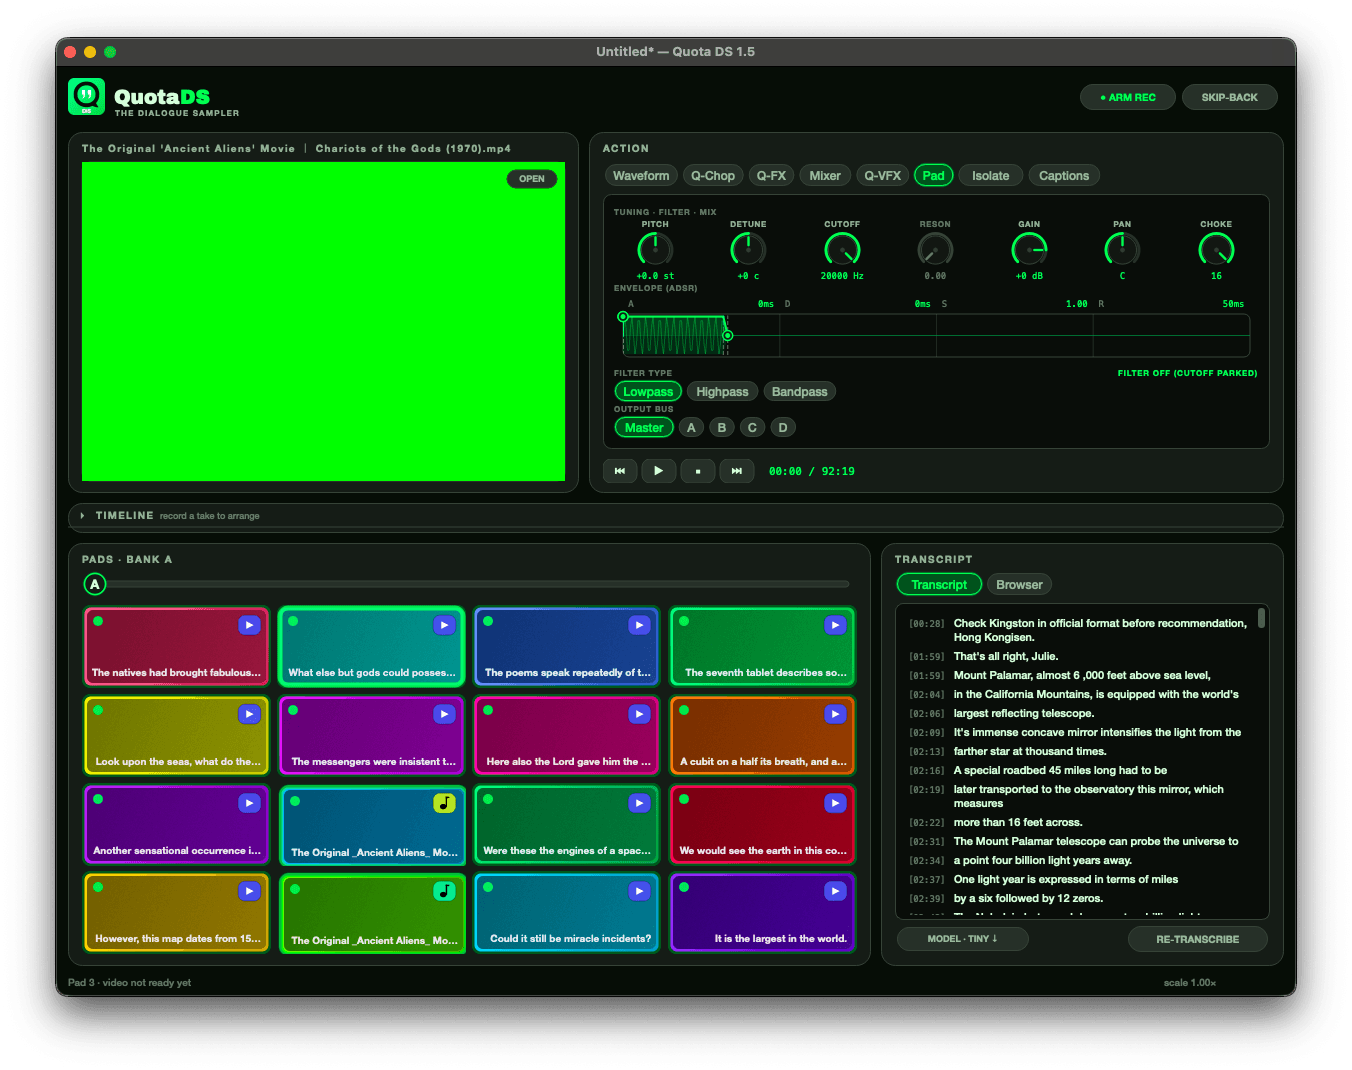
The grid is a 4x4 of 16 pads with a bank strip above it running A through H. The PAD tab edits whichever pad has focus, and every control is live. Drag one while the pad is still ringing and the sound bends in place. There is no apply button.
- PITCH shifts in semitones, varispeed like an SP-404, so pitch and length move together. Pitch a chop down and it gets longer and darker.
- DETUNE nudges in cents, for thickening a stack or pulling a sour word back in tune.
- CUTOFF and RESON are the filter. Lowpass, highpass or bandpass on the FILTER TYPE chips. Park a lowpass wide open or a highpass all the way down and the filter switches off and tells you it did.
- GAIN in dB, PAN across the field.
- CHOKE puts the pad in a group, 1 through 16, so two words never ring over each other.
- The ENVELOPE editor has three handles for attack, decay into sustain, and release.
- OUTPUT BUS sends the pad to Master or to bus A through D.
Both edges pull outward.
The Waveform tab shows the wave of whatever is loaded, with each chopped line painted as a colored band in its pad’s color. Click a band to bring that pad up without firing it. Grab either edge and drag.
Both edges pull outward, not just in. Drag the start earlier or the end later and it pulls more audio in from the source, so a slice is never stuck at wherever the chop first landed. Cut a word too tight and you open it back up instead of re-chopping. Zoom is FIT, minus and plus on the chip row, or scroll the wheel over the wave to zoom on the spot under the cursor.
Both edges are MIDI-mappable, and they follow whichever pad has focus, so you map start and end to two knobs once and never remap.
Hit a pad, cut the picture.
Drop a video file onto a pad and that pad plays the video. Hit it and the well cuts to the clip instantly. The newest hit owns the screen, so you can put TV static on one pad and a talking head on another and punch between them like drum hits. The pad plays the clip’s audio too, so you are performing the sound and the picture with the same gesture.
A dropped clip is a one-shot. It plays through once and the well goes back to its blank background, black by default, or chroma green or a color of your own if you want to key the pads over camera in post. The clip decodes to RAM when you assign it, not when you hit it, so the first press is already instant.
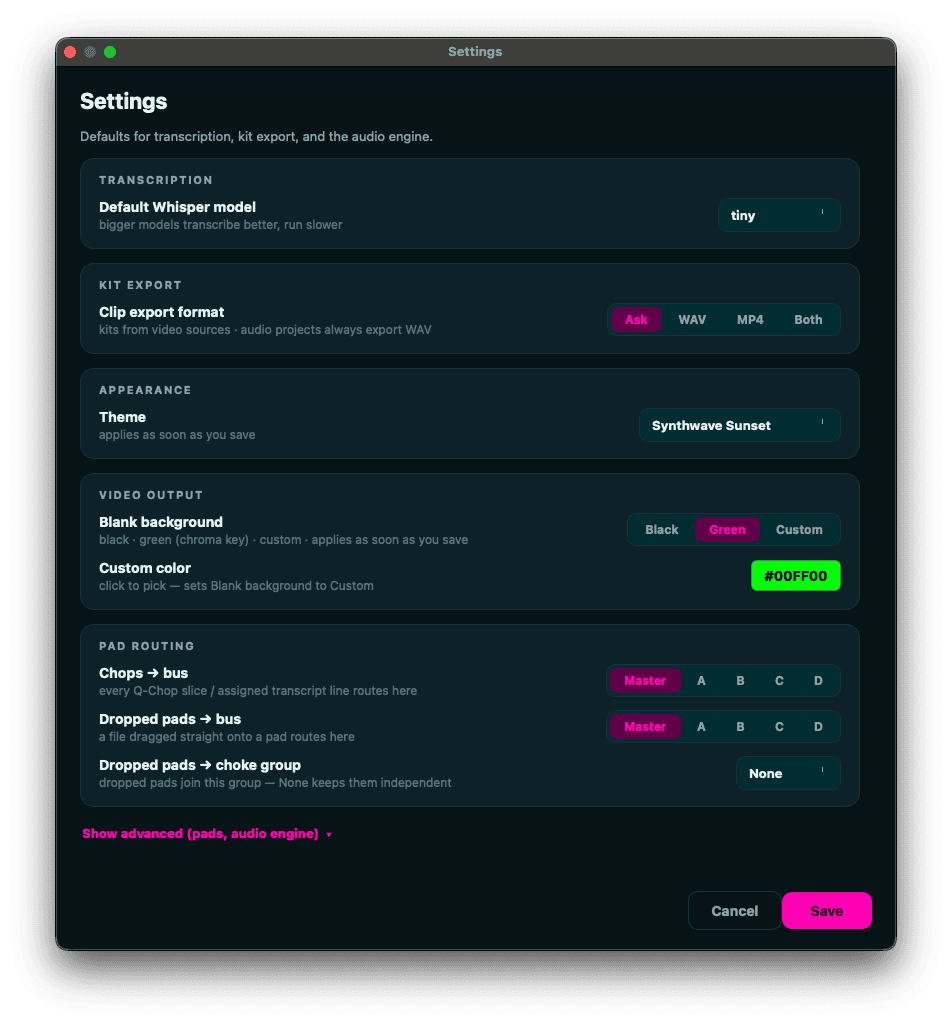
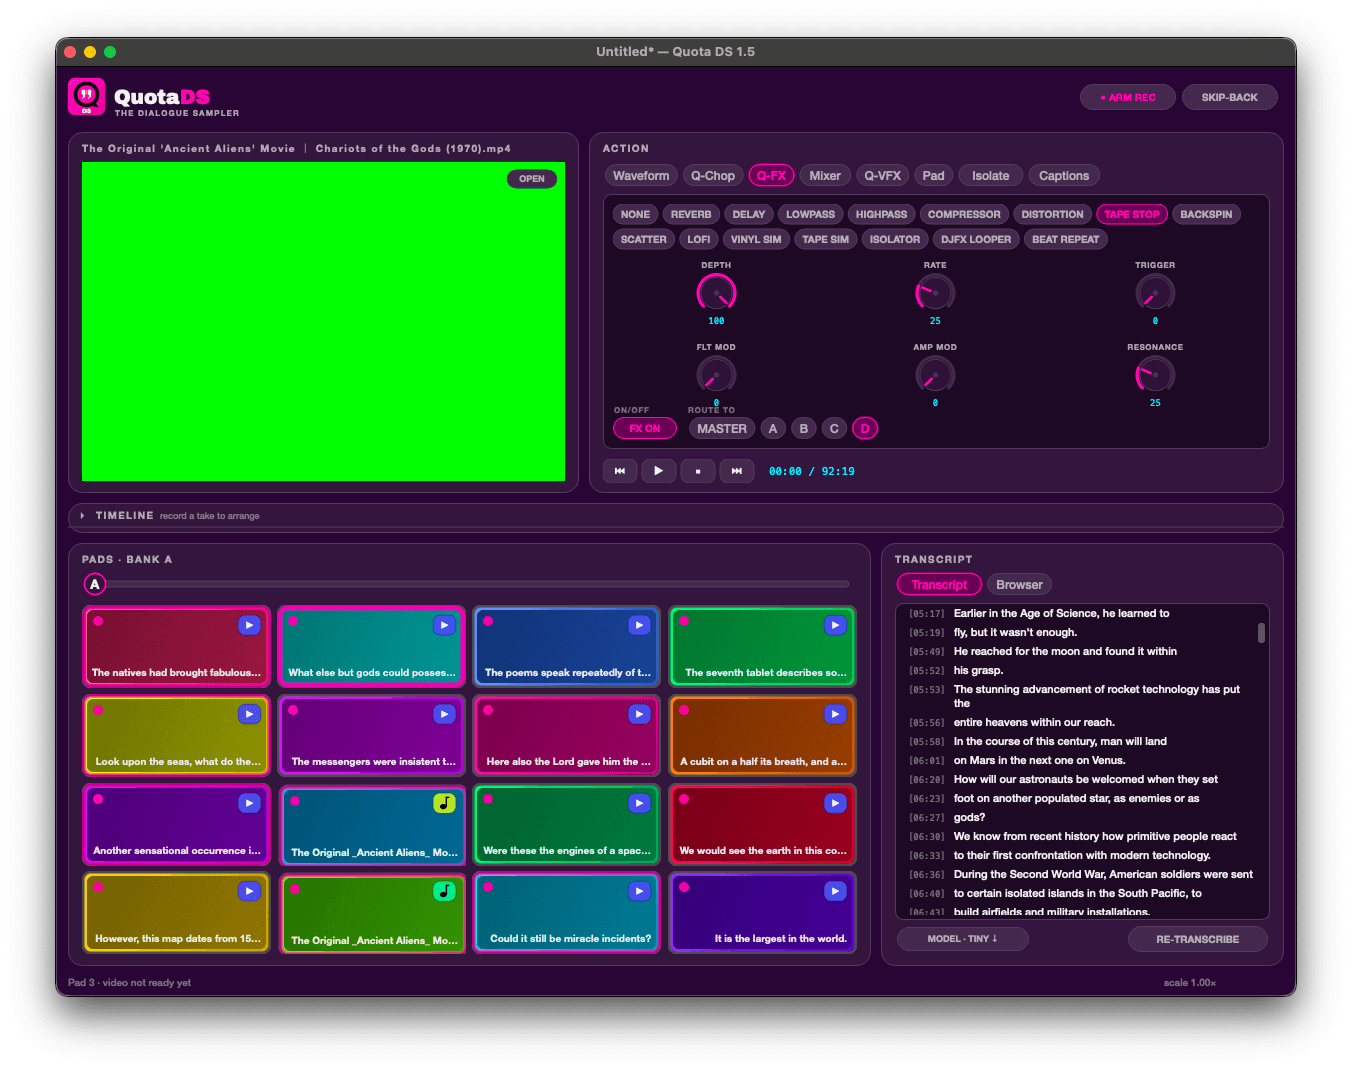
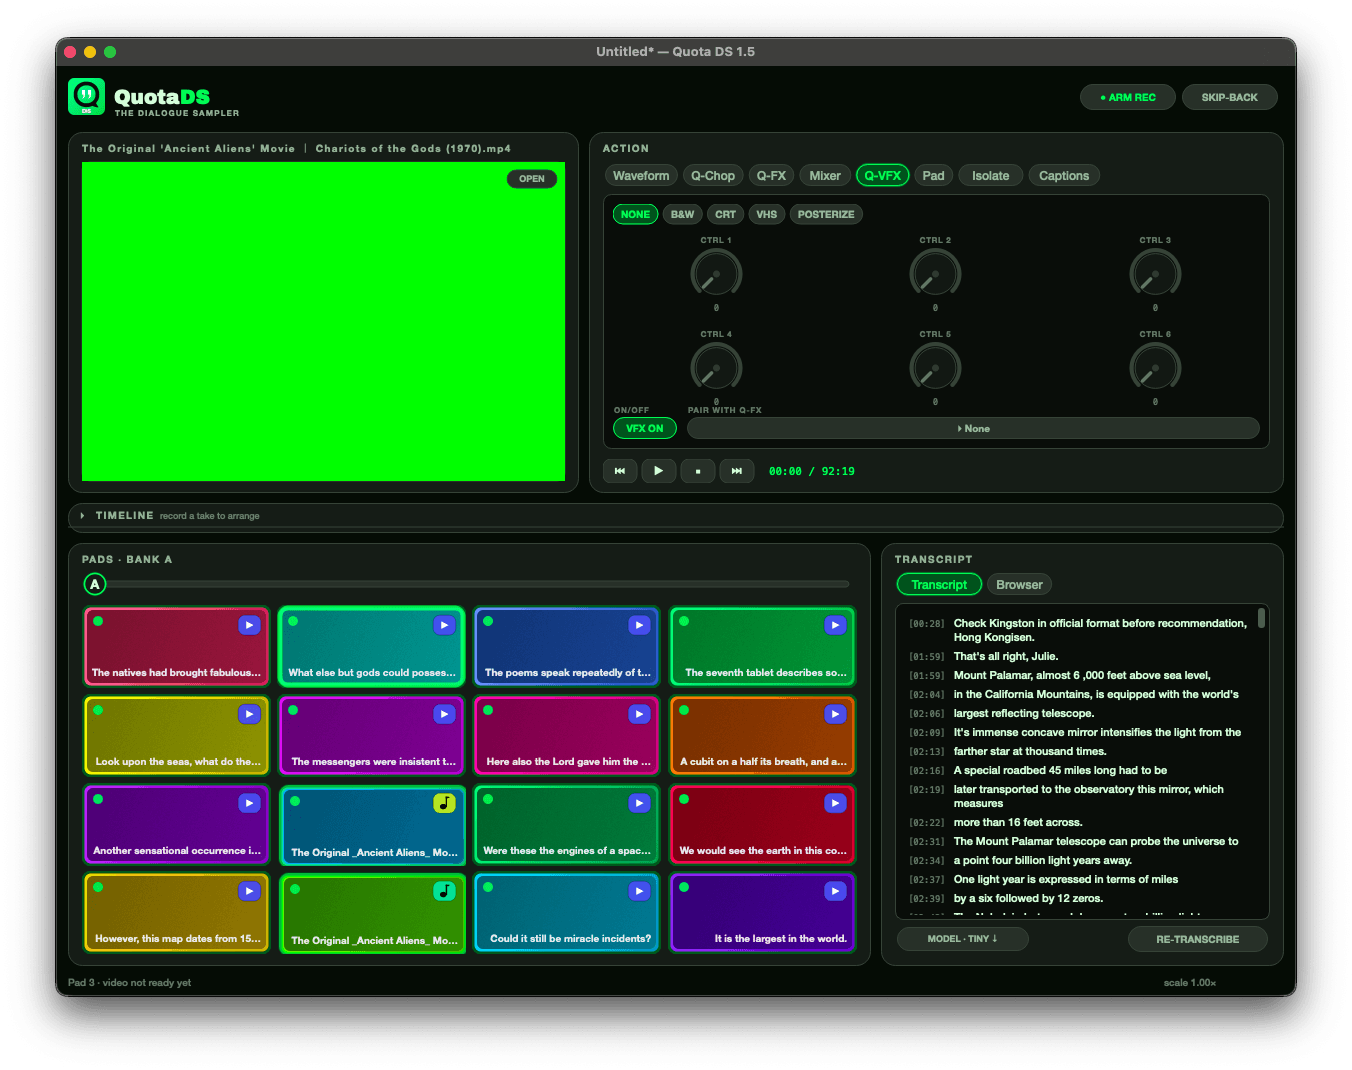
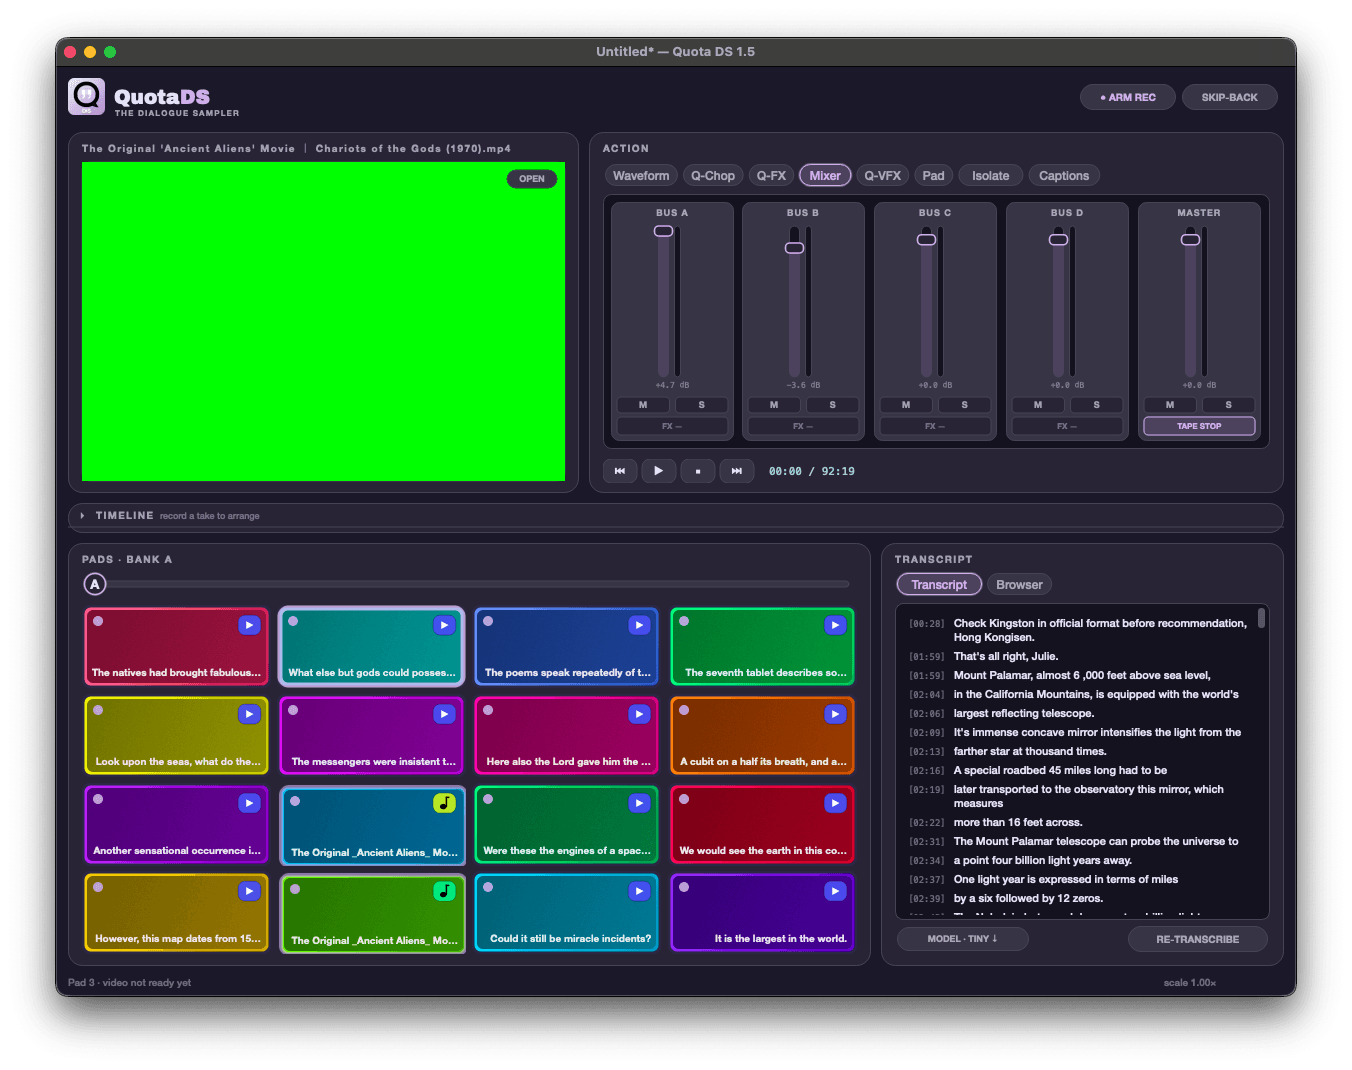
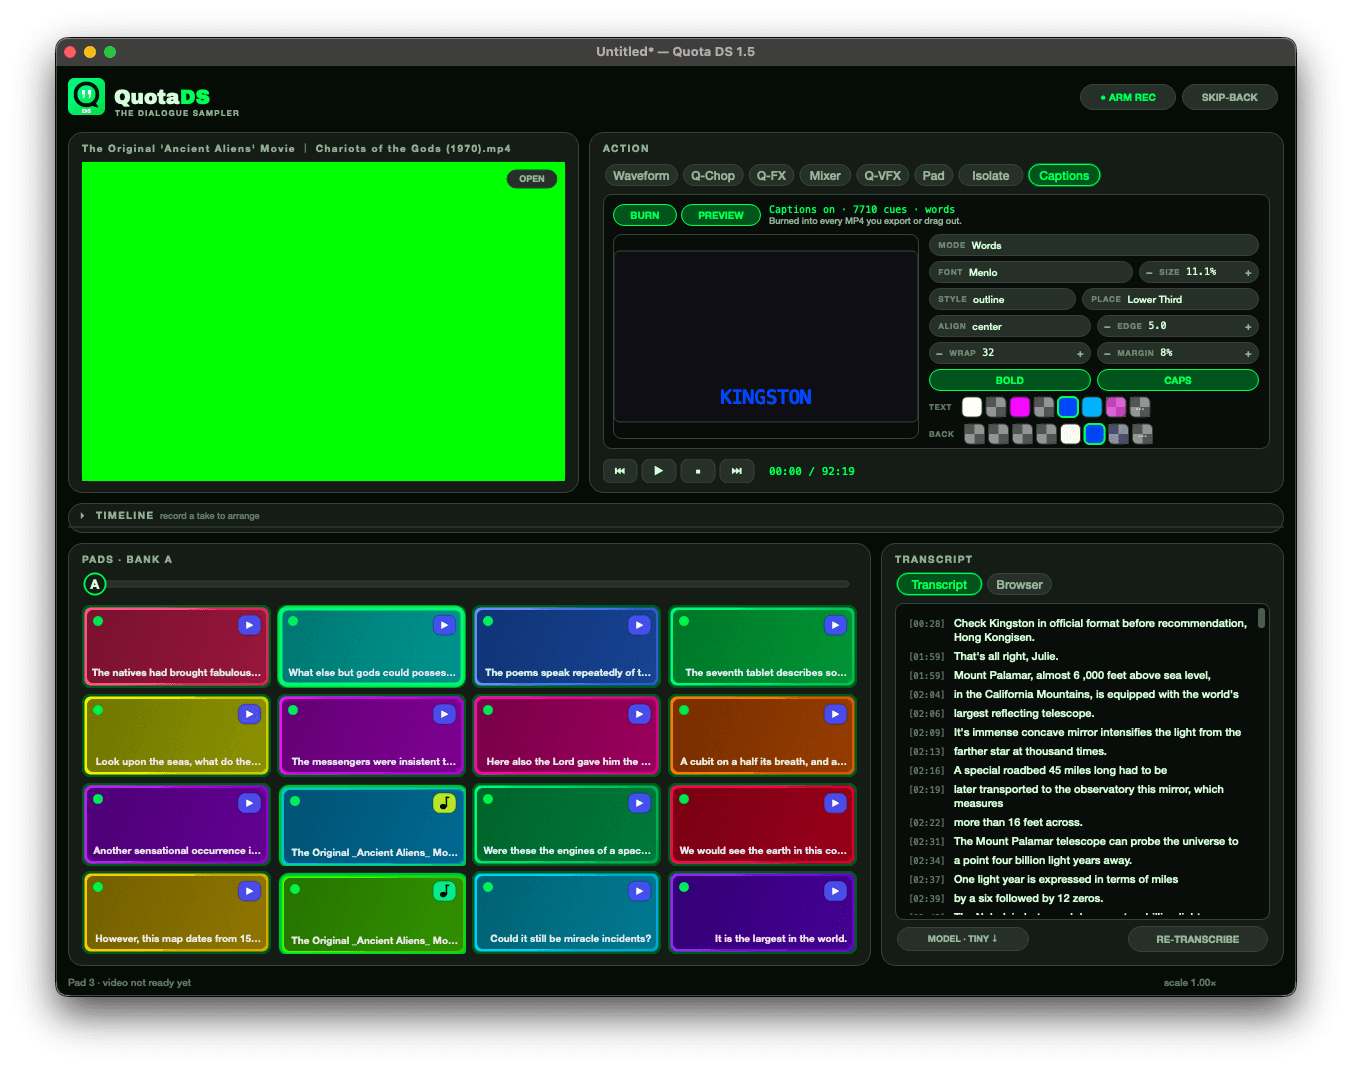
That is why the video well reads solid green in some of the shots further down this page. It is the chroma fill sitting between hits, waiting for the next pad. Set it back to black in Settings and it goes black.
The picture follows the pad’s own trim. Drop the same file on two pads, then trim each one on the Waveform tab. Trim one to the static at the head and the other to the voice further in, and each pad shows the part it plays instead of frame 0 twice. Chop a line in half and you get two shots.
Punch-In Layer is in the pad menu. A flagged pad cuts in over whatever is already running and the video underneath keeps going, so when the layer clip ends the base comes back mid-flight at wherever it has run to. Good for stabbing an accent over a base clip without stopping it.
Fifteen for the sound, four for the picture.
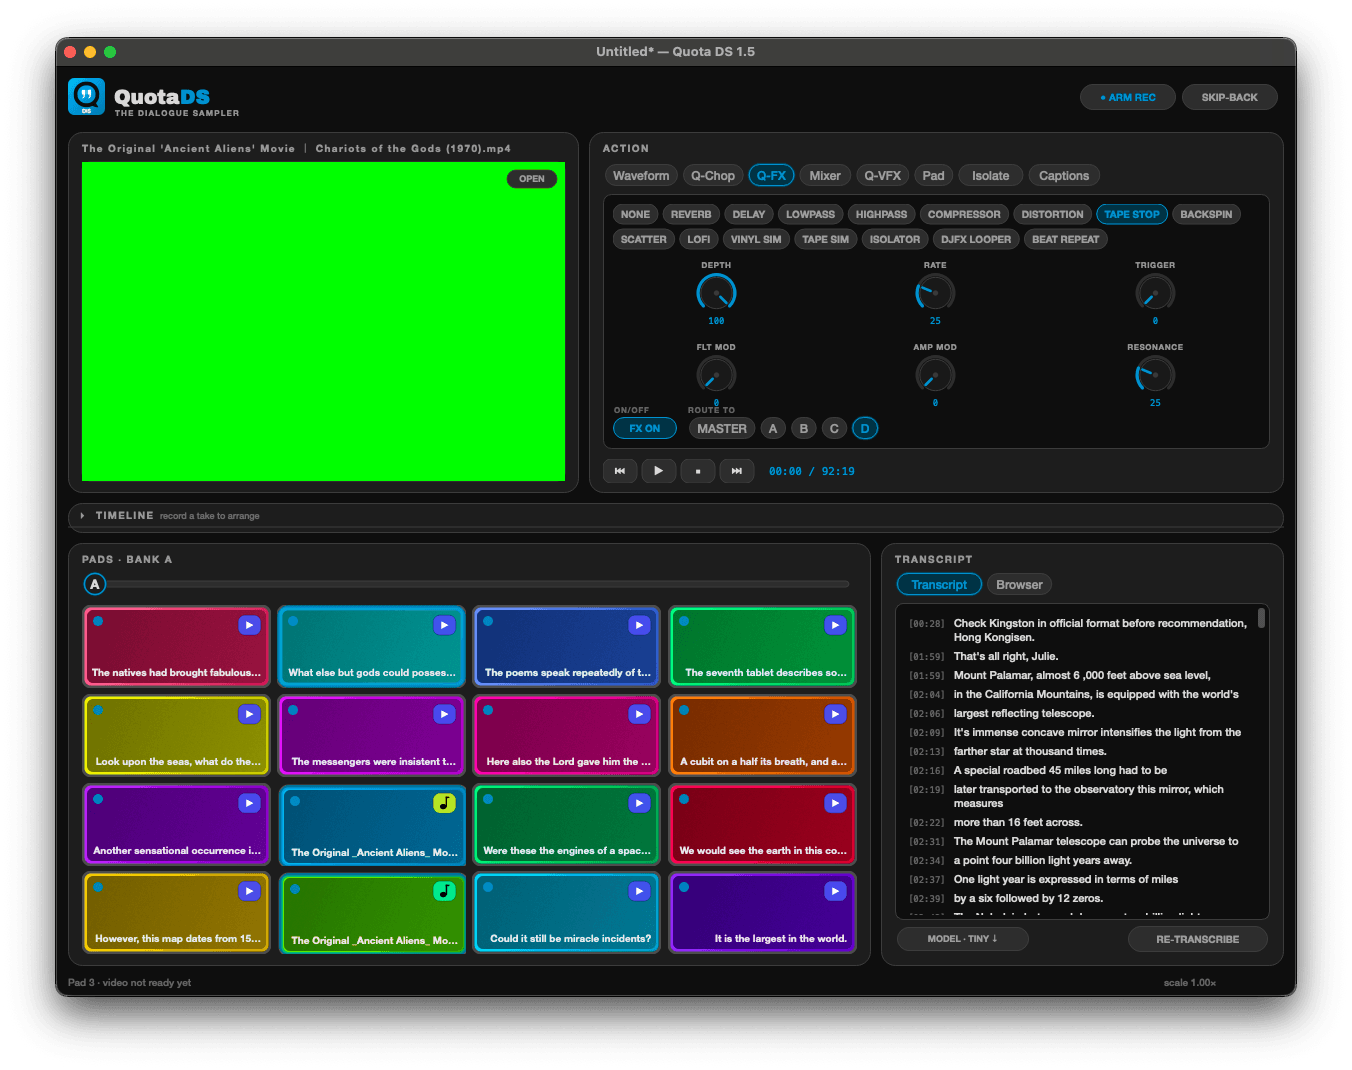
Q-FX
Runs one master effect at a time, picked from fifteen: reverb, delay, lowpass, highpass, compressor, distortion, tape stop, backspin, scatter, lofi, vinyl sim, tape sim, isolator, djfx looper and beat repeat. Six CTRL knobs, an ON/OFF bypass, and ROUTE TO so it lands on the master or on bus A through D.
Q-VFX
Does the same for the picture: B&W, CRT, VHS and Posterize, each with its own CTRL sliders and an ON/OFF. PAIR WITH ties a video effect to a Q-FX so the picture reacts when the sound does. Hit a backspin and watch the image go with it.
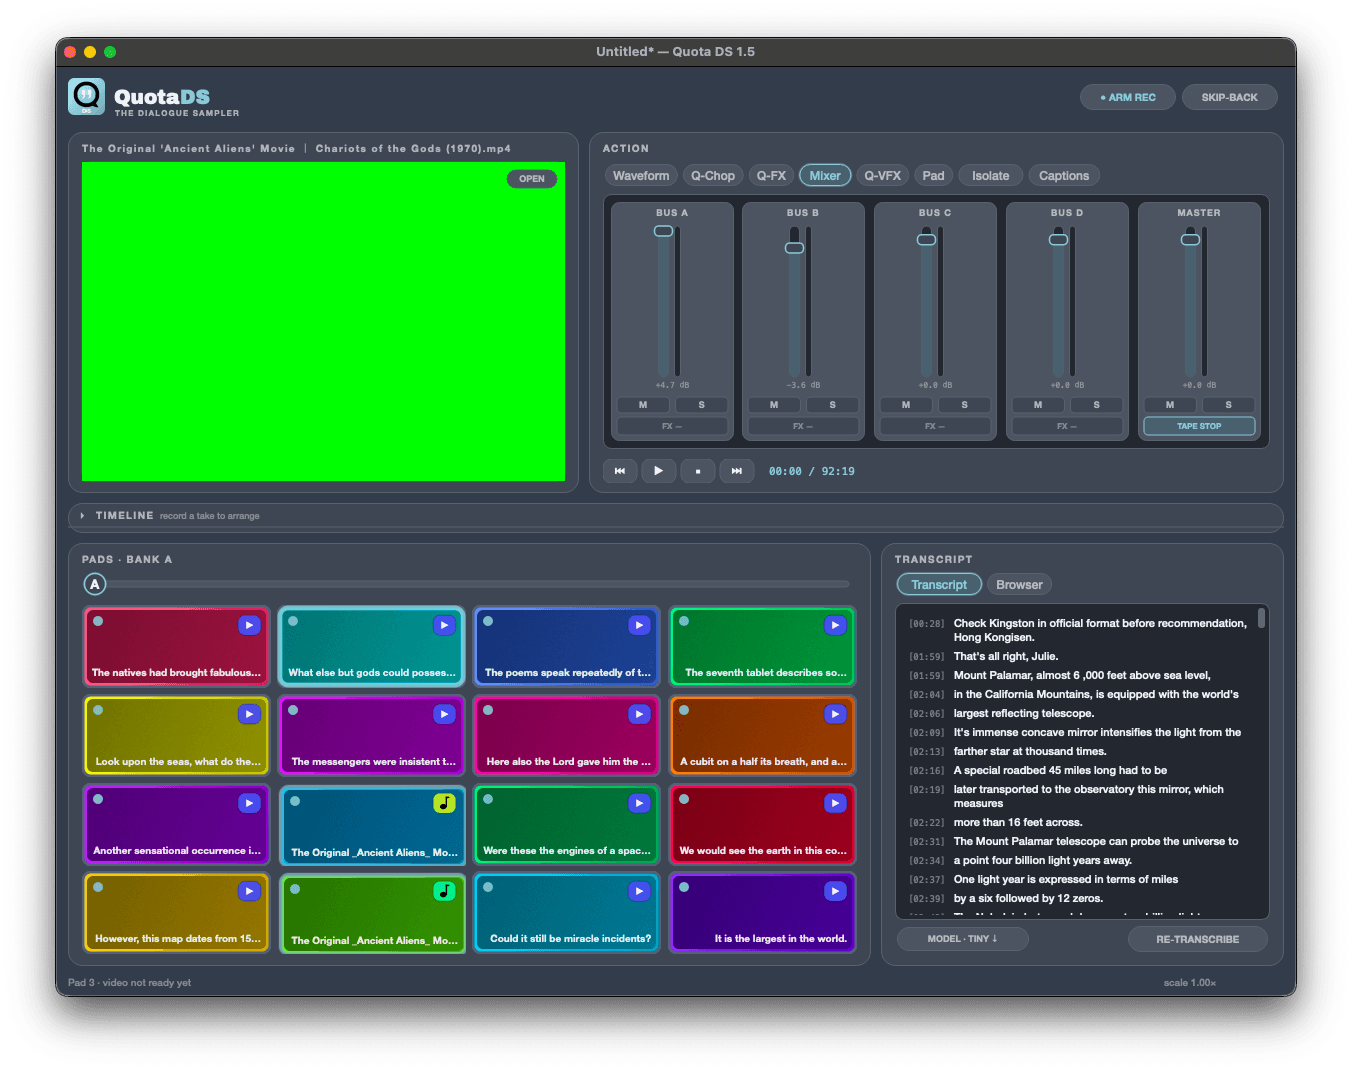
The mixer
Five strips: Bus A, B, C, D and Master. Each has a fader from silence to +6 dB with the exact value under it, a live meter, M and S chips, and an FX slot. Pads run straight to Master unless you send them to a bus. Levels, mutes, solos and bus effects all save with your project.
Play it live, then move it around after.
Two chips sit at the top right of the header, above everything else, so you can hit them mid-performance.
ARM REC starts recording. The chip lights up and counts, reading ● REC with a timer. The master mix goes to a WAV and every pad hit, mixer move and Q-FX change gets logged, so the take can be rebuilt. Takes land in your QuotaLibrary/Recordings folder, named with a timestamp. If there is a video source or any video pads in play, DS renders an MP4 of the performance in the background.
Stem recording writes each of the four buses to its own WAV alongside the master, post-FX and post-fader, so the parts you routed to A, B, C and D come out as separate files ready to drop into a DAW.
SKIP-BACK grabs what you already played. DS keeps a rolling buffer of the last 30 seconds of the master mix. Land something you were not armed for, hit SKIP-BACK, and it writes that stretch to a WAV instantly. It works whether or not ARM REC is on.
The timeline is a full-width band under the video row. It sits collapsed as a thin strip reading “record a take to arrange” and stays out of the way until there is something to arrange. Record a take and it opens on its own, one lane per pad you played, every clip drawn with the real waveform of the hit it came from. Not blocks. The actual shape of the audio.
- Drag a clip along its lane to move it in time. With SNAP on it lands on the beat.
- Drag a clip’s left or right edge to trim the in or out point.
- Drag across empty space to marquee-select, shift to add, Delete to remove.
- Every lane header has the pad name and an M and an S for mute and solo.
- The transport is in the band header. Play runs the arrangement back live with the playhead crossing your clips. The loop button arms looping, then you drag across the bar ruler to set the loop.
The transcript is already your caption track.
The Captions tab burns your transcript onto the video. You already typed nothing, so there is nothing to type twice.
Everything sits on one panel with a live preview, so you see the change as you make it instead of exporting to find out. MODE groups the text as words, phrases or groups of N. FONT and SIZE set the type, and size is a percentage of the video height, so captions stay right whether you export a square clip or a wide one. STYLE is how the text separates from the picture, an outline, a box or a band, with EDGE controlling how heavy that sits. PLACE and ALIGN put the block where you want it, with Lower Third as the default. WRAP sets how many characters ride on a line, MARGIN keeps the block off the edge of frame, and BOLD and CAPS are there for the loud ones. The TEXT and BACK swatch rows set the colors.
PREVIEW puts the captions live on the video panel while you perform. It is a toggle, and off it costs you nothing. BURN renders them into the MP4 on export. What you set in the preview is what lands in the file. The original video is never overwritten.
Three ways out.
The arrangement, as MP4. EXPORT on the timeline header renders what you built. The audio is baked fresh at export time, not lifted from the WAV the take recorded live, so if you moved a clip, trimmed it or deleted it after the fact, that is what lands in the file. The bake carries each pad’s gain, its captured velocity, pan and choke. It does not re-apply per-pad ADSR, pitch, filter or the mixer and Q-FX chain, so what you get is a clean dry master of your clips at their edited spots.
One pad, as a file. Drag a pad off the grid and it writes where you drop it. An audio pad writes a WAV. A pad with video behind it writes an MP4 on a plain drag, or a WAV if you hold Shift, and the pad’s own tooltip tells you which is which.
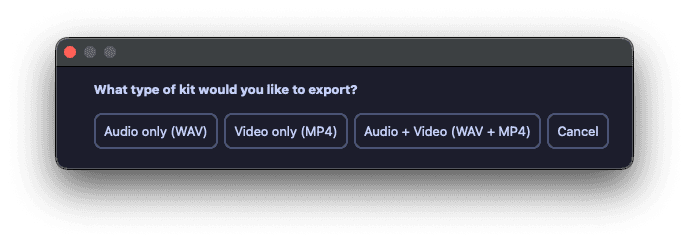
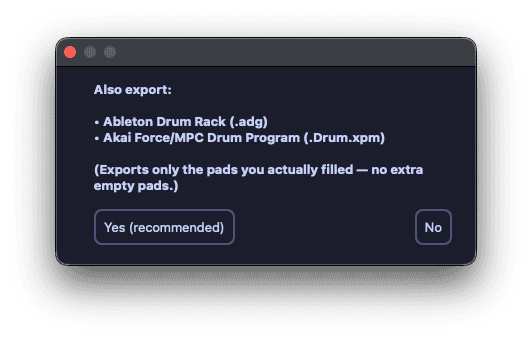
The whole kit. Export every filled pad as a folder of clips, and DS will write an Ableton Drum Rack (.adg) and an Akai Force / MPC program (.Drum.xpm) alongside them so the kit drops straight into your DAW. Empty pads are skipped. If you have Quota Kits, DS can hand the finished folder straight over and Kits opens on it. ffmpeg is bundled, so nothing extra is needed to write video.
Put it under your hands.
DS takes MIDI in, so you can drive it from a controller instead of the mouse. A MIDI Fighter Twister is a good fit, its encoders map cleanly onto the trim knobs and the Q-FX controls.
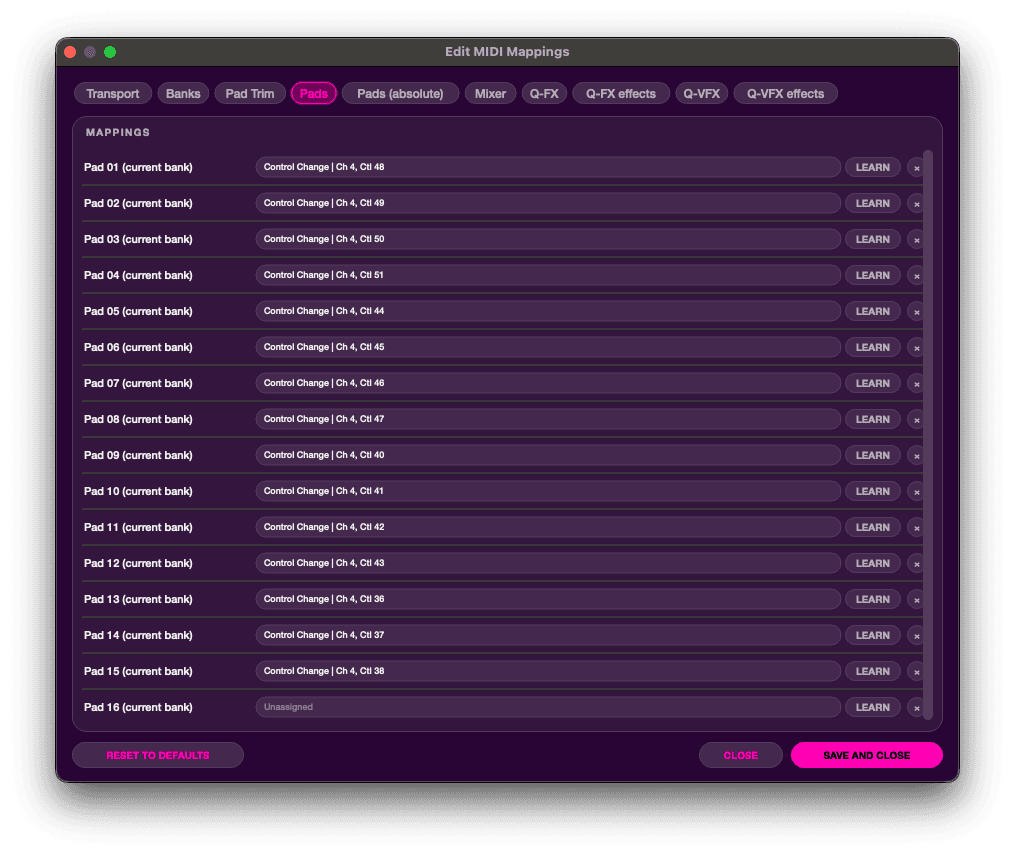
Open MIDI, then Edit MIDI Mappings. The actions are grouped across the top: Transport, Banks, Pad Trim, Pads, Pads (absolute), Mixer, Q-FX and Q-VFX. Click LEARN on a row, move the control, and it binds. Learn disarms itself after one message.
- Transport: play/pause, stop, rewind 5s, forward 5s.
- Pads: the 16 pads of the current bank, any pad by absolute address, and a CC to sweep banks.
- Active pad trim: two knobs live-scrub the focused pad’s start and end, and they follow whichever pad you focus next.
- Mixer: bus and master volume, mute, solo. A mapped mute or solo gets a TGL / MOM chip. TGL flips on each press, MOM holds while you hold.
- Q-FX and Q-VFX: the six CTRL knobs, on/off and effect select.
Ports are under MIDI, then MIDI Ports. More than one can be open at once, and a port you open is remembered and reconnected next launch.
One palette recolors the whole app.
Pick a theme in Settings and it applies as soon as you save. Same panel, same settings, different palette.
Four ways people run it.
Flip a movie line into a hook
Load the scene. Isolate the vocal so the score stops fighting the dialogue. Transcribe on base. Run Q-Chop on Sentences 16 and you have sixteen complete lines across bank A. Find the one that sits right, pitch it down a few semitones on the Pad tab so it gets longer and darker, put a lowpass on it, and play it against your drums.
Build a whole dialogue kit for your DAW
Q-Chop All Segments to get every line in the file on a pad. Walk the banks and delete what you do not want. Trim the keepers on the Waveform tab, pulling the edges out where the chop cut a word short. Then export the kit and let it write the Ableton Drum Rack and the MPC program alongside the WAVs.
Perform the video and the audio at once
Put your source clip on a few pads and trim each one to a different moment, so each pad shows the part it plays. Put static or a color card on another pad. Set Q-VFX to VHS and PAIR WITH a backspin. Arm the take and play it. The picture cuts where you hit, the effect moves when the sound does, and the MP4 renders in the background.
Cut a captioned clip for social
Load the clip, transcribe it, set MODE to phrases and PLACE to Lower Third. Turn PREVIEW on and play a pad so you can see what a line actually looks like on the picture. When the styling reads, arm a take, play your arrangement, then export with BURN on. The captions come from the transcript, so they land where the words land.
The questions people type.
What’s a good way to sample dialogue from a movie?
Load the movie into Quota DS. Whisper transcribes it on your machine, then Q-Chop slices the transcript onto the pads. Pick Smart, Sentences or All Segments, and pick 8, 16, 64 or 128 chops. Highlight any words in the transcript and click a pad if you would rather do it by hand.
Can I get clean dialogue out of a scene with music under it?
Yes. The Isolate tab separates the voice from the rest and writes VOCALS, INSTRUMENTAL, or both in one pass. The model ships inside the app, so it works offline. Run it before you chop and your pads get cut from the clean audio.
Can a sampler play video on the pads?
Yes. Drop a video onto a pad and hitting that pad cuts to the clip, with its audio. The picture follows that pad’s own trim, so you can split one clip across two pads and each pad shows its own part. Q-VFX adds video effects on top, and PAIR WITH lets a visual follow an audio effect.
How do I record a sampler performance and export it as a video?
Hit ARM REC and play the pads. When you stop, the timeline opens with one lane per pad and the real waveform of every clip you hit. Move the clips, loop what you want, play the arrangement back, then EXPORT to MP4. The audio is baked from where the clips sit at export time, not from the pass you first played.
Will Q-Chop wipe the pads I already set up?
No. It fills from A01 forward and steps over anything you placed yourself, overflowing into the next bank instead of writing over your work. UNDO CHOP and REDO CHOP are there if you want to try a different mode or count.
Does it need an account or an internet connection?
No account and no sign-in. Transcription and vocal isolation both run on your machine, and the isolation model ships inside the app. Whisper models are not bundled, so the first transcribe with a given model downloads it once, and pasting a link obviously needs a connection. Everything else runs offline.
Do I need to install ffmpeg or anything else?
No. ffmpeg is bundled. Transcription and video export both use it and it is already there.
Mac or Windows?
Both. macOS ships as a DMG, code-signed and notarized under a Developer ID, so it opens without a Gatekeeper block. Windows ships as an installer.
Get Quota DS.
macOS and Windows. Signed and notarized on Mac, an installer on Windows, ffmpeg bundled. No account, no sign-in. It runs on your machine.
$99 one-time.
Questions go to support@getquota.app.